
Retro gaming on a Lenovo M93P Tiny using RetroPie on Linux
![]()
In this post I will detail the steps I used to setup RetroPie on a Linux USB so that I could use it to convert my Lenovo M93P into a Retro Gaming machine. This is intended to be used as a general guide, not an optimal, elegant or even authoritative solution. If you’ve found a better way that works for you, by all means use it! Note that this guide can also be used to configure devices other than the M93P.
Why RetroPie
Simply put, it’s convenient. It provides UI and Configuration wrappers around Retroarch which is what I use for most of my Retro Gaming. Why not something like Batocera or Lakka then, you ask? Well, I did experiment with various other packages but most of them seemed to have issues that prevented me from using them for this project, e.g. read-only file systems, or troublesome configuration management in Retroarch. While RetroPie certainly has its own set of quirks, for the most part it just stayed out of my way.
Click here to go the RetroPie website.
Why a Lenovo M93P Tiny

As a Retro Gaming machine this device is great value IMO. It is compact, has 5 USB ports, 1 VGA port, 1 Display port, Ethernet and built-in WiFi. It also packs enough performance to run most emulated games at full frame rate. The only downside is the lack of HDMI but you don’t need that for retro gaming anyway, and you can use an adapter if you really need HDMI. Integrated Intel GPUs also don’t generally support 240p signals which is a real bummer but you can get great results using just a plain old VGA monitor and Super Resolutions!
Click here for the full specs.
Why Linux on a USB stick
I think it’s a quite a practical solution. Using a USB stick frees up the HDD of the M93P for a Windows OS. You can definitely use Windows as the host OS, but then configuring resolutions becomes a real pain. In fact, I’m not even sure it’s possible with the M93P’s integrated Intel GPU. And if you were planning on using Windows, you almost certainly won’t be able to get it configured appropriately on a USB stick, not to mention that you probably would not be reading this post in the first place :)
In terms of space, you aren’t likely to need many hundreds of GBs for Retro Gaming unless you’re planning on installing entire collections (I’ve always found that I usually only stick to a few dozen retro titles).
USB sticks are quite cheap; they’re portable, easy to clone/backup and they can be formatted in a way that exposes the ROM directories for use in Windows so it’s pretty simple to copy ROMs between operating systems when there’s no network available.
Can you use a Micro SD card with a USB adapter? Probably, but I’ve never tested it in this scenario. I don’t have any reason to believe that it wouldn’t work just as easily though.
At any rate, as mentioned before this is just a guide and you should really use the storage solution that best works for you.
Enough rambling, let’s get started!
What you will need
- 16GB or bigger USB stick for the Linux installation
- 8GB or bigger USB stick to install from
- Lenovo M93P Tiny with internet access (and a keyboard, monitor)
- A suitable Debian-based Linux Distro image
If possible use a separate machine (maybe a laptop) to install the Linux on to the USB. This frees up your primary machine for Internet access if you need it, and if there’s some sort of catastrophic error your primary machine will be unscathed. You can use the M93P for this task.
For the Linux Distro, I used Ubuntu Server 20.04 so this guide assumes that as the host, but you can use whatever you like. Modify/omit steps as you see fit.
Preparing the Live USB
Write the Linux ISO to the USB stick. You can use Balena Etcher for this task. If you’re having trouble, follow the instructions provided here.
Installing Linux
Ensure that the machine you’re going to use for this task is set to boot from USB devices. This setting is usually stored in the BIOS and changing it will depend on your machine. Once you’ve done that, insert the Live USB stick and reboot. You can insert the USB stick you’re going to install to at this point. You should eventually end up with a screen that looks like this:

Note: Completing each step requires you to select “Done” or “Continue”
- Select your language to continue (this guide assumes English)
- Select your keyboard layout
- Skip any steps that ask you for network/proxy information
- Use the default Ubuntu mirror (you can change this later)
Configuring your USB stick
You will eventually reach the screen for configuring your disk. Ensure that your destination USB stick is visible before continuing.
You can select a Custom Storage layout if you want for example to put your ROMs on a separate partition. This is useful for example if you want a partition that is accessible in Linux and Windows. This type of partition setup makes it easy to copy ROMs between machines when no network is available. The steps to enable this is beyond the scope of this post.
It’s very important that you do not select the incorrect disk at this step. Doing so can destroy your current OS configuration!

- Select Use an entire disk (double-check that the correct disk is selected!)
- Examine the details on the next screen and continue or go back if there’s an issue
- Ensure that you’ve read and understood the warning before selecting Continue

Profile setup
- Enter the Name and User name (I use
retrofor both of these) - Enter the server name (I use
retrobuntu) - Enter the password - write this down somewhere!

Finalise installation
- Choose to Install OpenSSH (don’t configure SSH identity)
- Skip installing Server Snaps if prompted (leave everything unselected)
- Wait for the installation to complete
If you’re not using the M93P for the installation task, ensure that it also has USB boot priority. Once you’ve done this, insert your new created Linux USB stick (the stick you installed to) and reboot. If you did use the M93P to perform the installation, then simply remove the USB that you installed from and reboot.
Configuring the Internet
You will need a keyboard and monitor connected to the M93P for the following steps, and the device needs to be connected to the network using an Ethernet cable. WiFi configuration is beyond the scope of this post, but it’s not hard to do. Each step also assumes that you’re in your home directory, which should be the case if you follow all the steps. Otherwise type
cd ~at the prompt to take you there.
Once the OS has loaded, you should be presented with a terminal login prompt (you may need to press Enter first)
- Enter the username you selected during the Installation procedure
- Enter the password (I hope you wrote it down somewhere!)
- Enter
ip a
You should see output similar to this:
retro@retrobuntu:~$ ip a
1: lo: <LOOPBACK,UP,LOWER_UP> mtu 65536 qdisc noqueue state UNKNOWN group default qlen 1000
   link/loopback 00:00:00:00:00:00 brd 00:00:00:00:00:00
   inet 127.0.0.1/8 scope host lo
      valid_lft forever preferred_lft forever
   inet6 ::1/128 scope host
      valid_lft forever preferred_lft forever
2: eno1: <BROADCAST,MULTICAST,UP,LOWER_UP> mtu 1500 qdisc state DOWN group default qlen 1000
   link/ether 08:00:27:98:5a:42 brd ff:ff:ff:ff:ff:ff
We are going to configure the eno1 interface using netplan. The installation usually creates a file called
00-installer-config.yaml in the /etc/netplan/ directory to store network information. Since we opted to skip
network configuration it won’t contain relevant network info, but we can add our own.
- Enter
sudo vi /etc/netplan/00-installer-config.yaml
I use
vias my text editor. You can usenanoor whatever your prefer
retro@retrobuntu:~$ sudo vi /etc/netplan/00-installer-config.yaml- Replace the existing content with the following (use your network interface name instead of
eno1if it differs):
network:
  ethernets:
    eno1:
      dhchp4: yes
YAML files are extremely finnicky about indentation. Ensure you’ve entered the configuration details correctly before proceeding
- Apply the configuration with
sudo netplan apply - Bring up the network interface with
sudo ip link set eno1 up - Check that you’re connected and have been assigned an IP address using
ip a(it will be next to theinetentry underneatheno1
@retrobuntu:~$ sudo netplan apply
[sudo] password for retro:
retro@retrobuntu:~$ sudo ip link set eno1 up
retro@retrobuntu:~$ ip a
1: lo: <LOOPBACK,UP,LOWER_UP> mtu 65536 qdisc noqueue state UNKNOWN group default qlen 1000
    link/loopback 00:00:00:00:00:00 brd 00:00:00:00:00:00
    inet 127.0.0.1/8 scope host lo
       valid_lft forever preferred_lft forever
    inet6 ::1/128 scope host
       valid_lft forever preferred_lft forever
2: eno1: <BROADCAST,MULTICAST,UP,LOWER_UP> mtu 1500 qdisc fq_codel state UP group default qlen 1000
    link/ether 00:23:24:57:b9:3c brd ff:ff:ff:ff:ff:ff
    inet 192.168.1.249/24 brd 192.168.1.255 scope global dynamic eno1
       valid_lft 86243sec preferred_lft 86243sec
    inet6 fdeb:4c5d:81a5:0:223:24ff:fe57:b93c/64 scope global mngtmpaddr noprefixroute
       valid_lft forever preferred_lft forever
    inet6 fe80::223:24ff:fe57:b93c/64 scope link
       valid_lft forever preferred_lft forever
ping -c 3 google.comas a sanity check. Ensure the ping is successful before continuing.
retro@retrobuntu:~$ ping -c 3 google.com
PING google.com (172.13.14.24) 56(84) bytes of data.
64 bytes from jnb02s03-in-f14.1e100.net (172.13.14.24): icmp_seq=1 ttl=54 time=25.3 ms
64 bytes from jnb02s03-in-f14.1e100.net (172.13.14.24): icmp_seq=2 ttl=54 time=24.0 ms
64 bytes from jnb02s03-in-f14.1e100.net (172.13.14.24): icmp_seq=3 ttl=54 time=26.1 ms

--- google.com ping statistics ---
3 packets transmitted, 3 received, 0% packet loss, time 2003ms
rtt min/avg/max/mdev = 24.023/25.158/26.119/0.864 ms
A this point you should have a working network, so you can continue the setup from another machine using SSH if you
prefer. Enter ssh retro@<IP address of the M93P> on the client machine. e.g.
C:\ssh retro@192.168.1.249Confirm the host when asked, and enter your password to get SSH access.
Install updates
sudo apt update -y && apt upgrade -y
This could take a few minutes depending on your network speed and how many updates need to be applied.
Enable auto-login
- Enter
sudo systemctl edit getty@tty1.serviceand insert the following information:
[Service]
ExecStart=
ExecStart=-/sbin/agetty --noissue --autologin retro %I $TERM
Type=idle
If you chose a username other than
retrouse that name after--autologininstead
- Exit using
Ctrl-Xand save to the default file name (pressY, thenEnter)
Configuring Graphics
For this project I use the i3 Tiling Window Manager because it’s light on resources and I don’t need anything fancy. It’s also easier to configure to make it present as a “blank” screen while loading ROMs and it provides useful terminal management options.
You can obviously skip this step if your distro includes a Window Manager already.
Installing i3
xinit, xterm and x11-xserver-utils are included in the install command as we will need them later.
- Enter
sudo apt install i3 xinit xterm x11-xserver-utils -y
Configuring the X Server Wrapper
- Enter
sudo vi /etc/X11/Xwrapper.configand ensure the following lines are uncommented (add or modify them if necessary):
needs_root_rights=yes
allowed_users=anybody
Auto-starting the X Server
- Enter
echo "[[ -z \$DISPLAY && \$XDG_VTNR -eq 1 ]] && exec startx" >> .bashrc
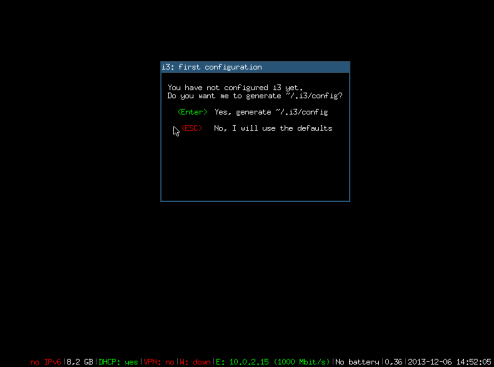
At this point it’s a good idea to reboot using sudo reboot to check that the system boots and logs on automatically,
and starts i3. If you’ve been following this guide and performed all the steps correctly, you should end up with i3
prompting for Configuration details:
Configuring i3
- Press
Enterto generate the configuration file - Press
Enteragain to use the Windows key as the default modifier
At this point you can continue the via SSH as before, or you can press
Win+Enterto open a terminal on the M93P and work there
- Enter
vi .Xdefaultsand write the following information to the file:xterm*background: black xterm*foreground: lightgray uxterm*background: black uxterm*foreground: lightgray
This will change change the background of the terminal from white to black.
- Enter
echo "exec --no-startup-id xterm -e emulationstation" >> .config/i3/configto auto-startEmulationStation
When you quit EmulationStation, you can get back to it by pressing
Win+Enterto open a terminal and then runningemulationstationat the command line.
Adding modelines
Newer versions of CRT SwitchRes will try to find the best
Super Resolutionautomatically but this section is included for the sake of completeness. I recommend that you skip this section and come back it later if you find that Retroarch is not switching resolutions correctly.
WARNING: Setting modelines incorrectly can permanently damage your CRT monitor!
This configuration will largely depend on your monitor. If you’ve been setting this up using a CRT, you may have noticed that the resolution goes all wonky during the OS boot sequence. This is a fairly complex topic on its own because it has to do with things like Kernel Mode Setting and the way graphics drivers read EDID information from the monitor, so I won’t be covering it in significant detail.
For this project I’m going to assume 640x480 as the default resolution. If your resolution looks fine as is,
you can simply ignore all the lines before the Super Resolution modes. If not, and the 640x480 modeline does not
work with your monitor, you’ll probably have to Google some suitable modelines for your model.
# This information should go into a file called ".xprofile"

# This is the "default" mode
xrandr --newmode "640x480p" 25.2 640 668 752 790 470 490 495 540 -HSync -Vsync
xrandr --addmode VGA-1 "640x480p"
xrandr --output VGA-1 --mode "640x480p"

# CRT SwitchRes should handle Super Resolutions automatically, but you can include
# these for use in other emulators/games

# These are the `Super Resolution modes` - these may differ according to your monitor and GPU
xrandr --newmode "2560x192_60.00" 32.26 2560 2408 2624 2688 192 193 196 200 -HSync +Vsync
xrandr --newmode "2560x200_60.00" 33.95 2560 2424 2640 2720 200 201 204 208 -HSync +Vsync
xrandr --newmode "2560x240_60.00" 42.55 2560 2480 2704 2848 240 241 244 249 -HSync +Vsync
xrandr --newmode "2560x224_60.00" 39.14 2560 2456 2680 2800 224 225 228 233 -HSync +Vsync
xrandr --newmode "2560x237_60.00" 41.80 2560 2472 2696 2832 237 238 241 246 -HSync +Vsync
xrandr --newmode "2560x256_50.00" 36.54 2560 2440 2664 2768 256 257 260 264 -HSync +Vsync
xrandr --newmode "2560x254_55.00" 40.73 2560 2464 2688 2816 254 255 258 263 -HSync +Vsync
xrandr --newmode "2560x480_60.00" 95.42 2560 2624 2880 3200 480 481 484 497 -HSync +Vsync
xrandr --addmode VGA-1 "2560x192_60.00"
xrandr --addmode VGA-1 "2560x200_60.00"
xrandr --addmode VGA-1 "2560x240_60.00"
xrandr --addmode VGA-1 "2560x224_60.00"
xrandr --addmode VGA-1 "2560x237_60.00"
xrandr --addmode VGA-1 "2560x256_50.00"
xrandr --addmode VGA-1 "2560x254_55.00"
xrandr --addmode VGA-1 "2560x480_60.00"
If you haven’t been using the same configuration as I have up till now then you may need to replace VGA-1 in the
snippet above with your own monitor. You can use xrandr for this:
retro@retrobuntu:~$ xrandr
Screen 0: minimum 320 x 200, current 640 x 480, maximum 16384 x 16384
VGA-1 connected primary 640x480+0+0 (normal left inverted right x axis y axis) 166mm x 125mm
Note the name before connected primary and if it differs from VGA-1 then use that instead.
- Enter
echo "[ -f ~/.xprofile ] && . ~/.xprofile" >> .xinitrc
This will load the modelines automatically when the X server is initialised.
- Enter
echo "exec i3" >> .xinitrcto re-enablei3
Configuring Audio
You will need to connect speakers to the front audio-jack of the M93P for this section.
- Enter
sudo apt install pulseaudio pulseaudio-utils alsa-utils -yto install PulseAudio and the required utilities - Enter
pulseaudio -Dto start the PulseAudio daemon - Enter
pacmd list-sinks | grep -e 'name:' -e 'index:'to determine the name of the PCM soundcard
retro@retrobuntu:~$ pacmd list-sinks | grep -e 'name:' -e 'index:'
  * index: 0
        name: <alsa_output.pci-0000_00_1b.0.analog-stereo>
In this case, we want the name alsa_output.pci-0000_00_1b.0.analog-stereo. It may differ depending on your device
and/or distro. We need to set this to the default because connecting something like a PS4 controller can change the
order of the sound cards indices, and therefore the default sound device as well.
- Enter
sudo vi /etc/pulse/default.pato edit the PulseAudio default configuration. - Find the line that says
#set-default-sink output(it should be the second-last line) and change it to
set-default-sink alsa_output.pci-0000_00_1b.0.analog-stereo- Save and exit, and restart PulseAudio with
pulseaudio -k
If there’s an error at this point, double-check that you’ve entered the correct information. If all the info is correct try rebooting. Pulse can be quite temperamental.
- Enter
speaker-testto test your audio settings. - Press
Ctrl+Cand wait a few moments to end the test - If you did not hear any static coming from the speakers, check your speaker volume and try again
- If still no volume, enter
alsamixer. Press F6 to select the select card (HDA Intel PCH) and adjust the volume using the arrow keys:
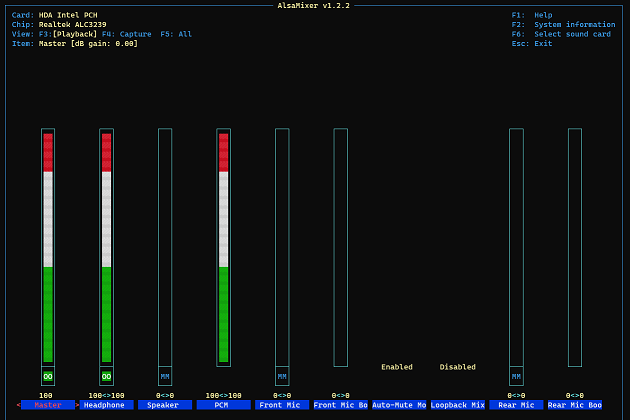
Exit the application (Press Esc) and run the speaker-test again. If it still doesn’t work, you’ll need to ensure that
there are no problems with your speakers and audio hardware.
Installing RetroPie
- Enter
sudo apt-get install -y git dialog unzip xmlstarletto install the prerequisites - Enter
git clone --depth=1 https://github.com/RetroPie/RetroPie-Setup.gitto download the latest RetroPie setup script - Enter
sudo ./RetroPie-Setup/retropie_setup.shto install dependencies and run the setup application - Read the notice, and select
Basic Installon the main screen:
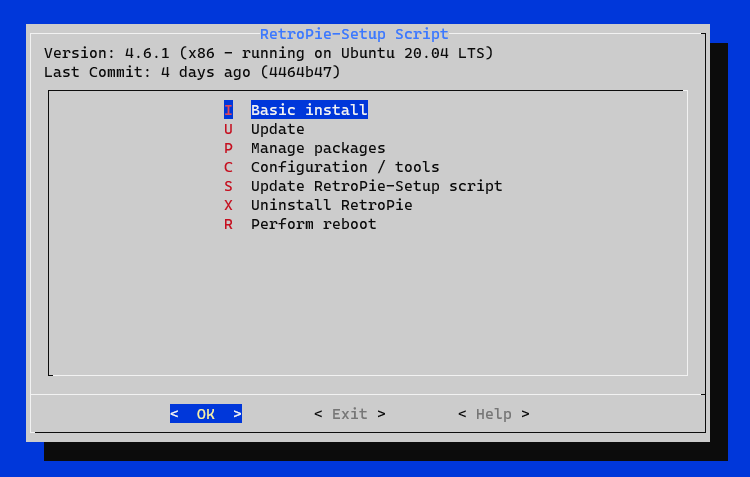
This process will take around 35 minutes to complete, so let it run and come back to it later. Once it has completed
you can exit the app to get back to the terminal. At this point you can issue a sudo reboot and the device should
boot directly into EmulationStation! Take some time to
setup a controller before continuing.
Configuring RetroArch
- On the
RetroPiemenu, selectRetroArchand enter your password to enter the configuration screen - Enable
Show Advanced SettingsunderSettings->User Interface
- On the same menu select
Appearanceand turn offLock Menu Aspect Ratio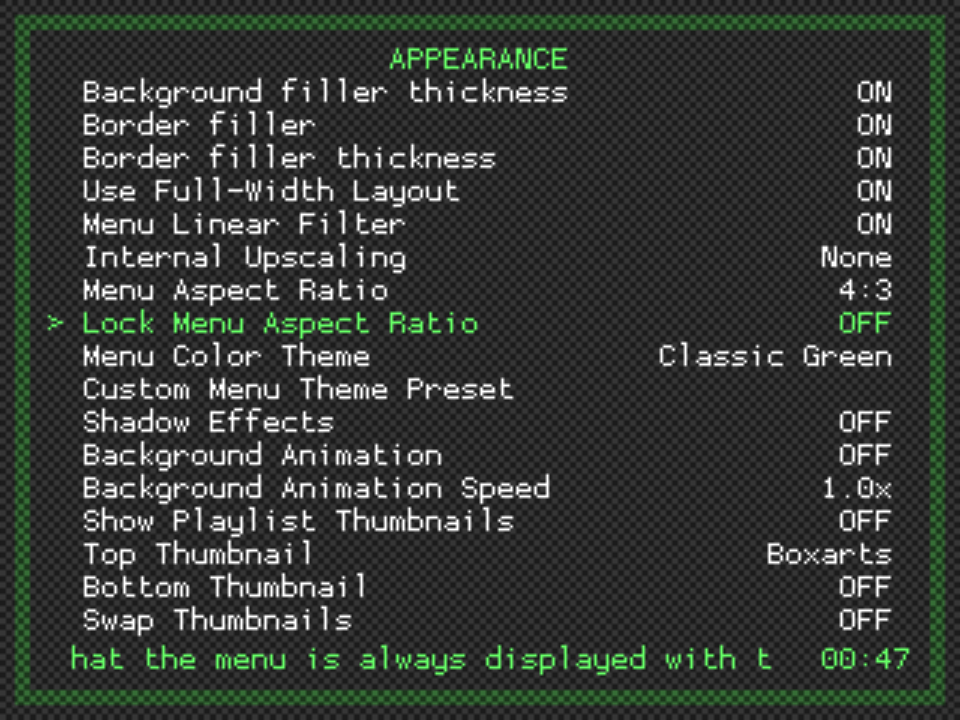
- Enable
CRT SwitchResunderSettings->Video->CRT SwitchRes- If you’re using an RGB monitor, select
15khz - If you’re using a VGA or Arcade monitor, select
31khz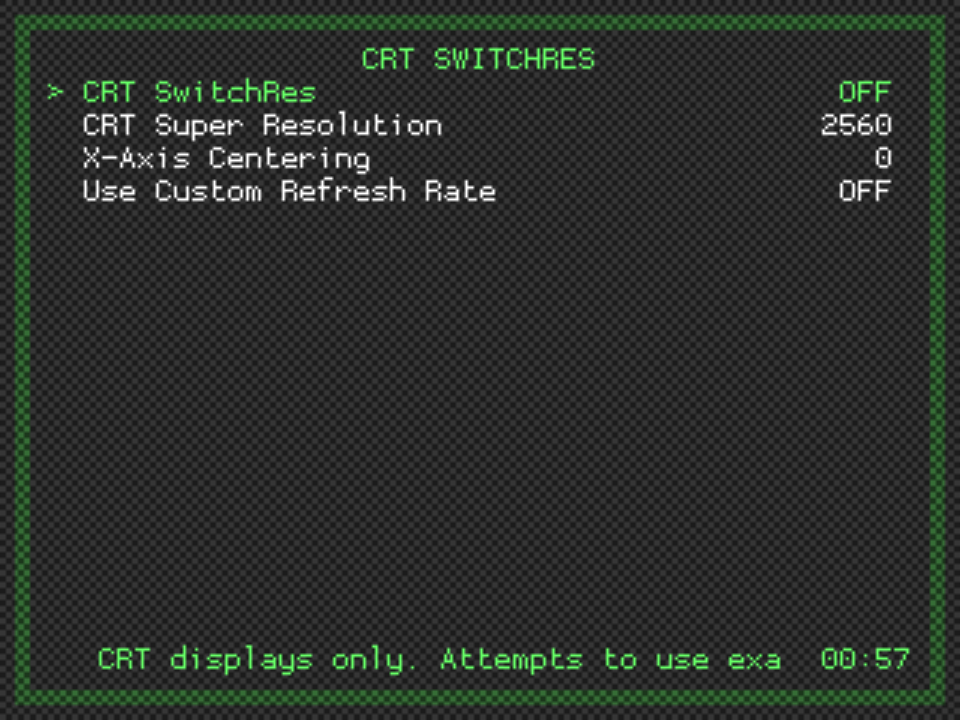
- If you’re using an RGB monitor, select
- 1920 tends to look better on Intel GPUs, but YMMV
- [Optional] Even though we configured the audio through Pulse, I’ve found that setting the driver
alsaperforms better. YMMV. The setting can be found underSettings->Drivers->Audio - Save the Configuration using
Configuration File->Save Current Configuration
That’s it! You can now exit the configuration, copy some ROMs over and enjoy some retro gaming! For copying ROMs over
the network to the M93P, I use WinSCP. Use the same details that you used for
SSH access and copy the ROMs to the appropriate folders. For example, to play Street Fighter 2: Champion Edition,
you copy the sf2ce.zip file to the directory ~/RetroPie/roms/arcade.
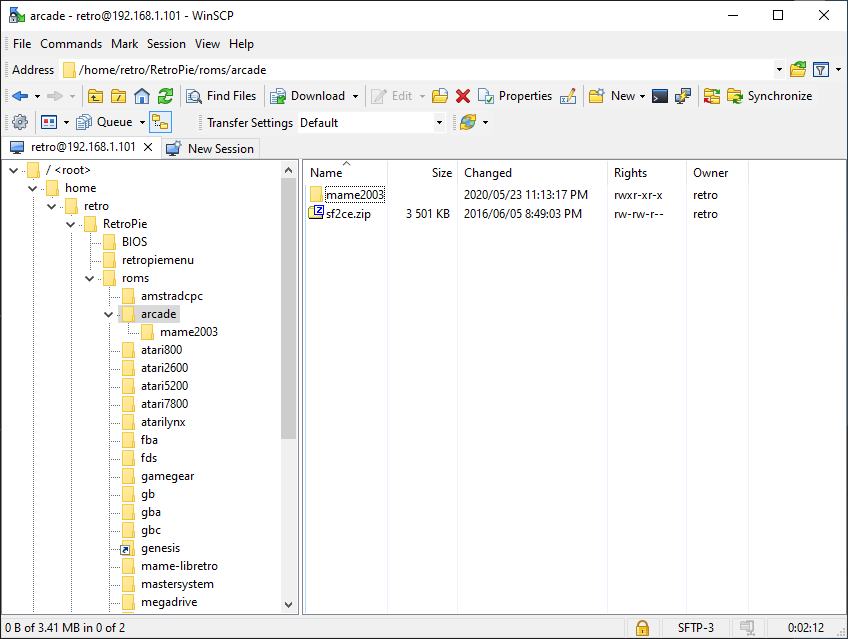
Now all you have to do is restart EmulationStation and the Arcade menu option will appear with the game available.